Showing posts with label Pinterest. Show all posts

Wednesday, September 18, 2013

Making Dinner Easier Part 1

You know that feeling when your kids get off the bus, 
homework is getting done and  
dinner is prepped and ready to serve

::record scratch::

Yeah, me neither, for a really long time
Then I got smarter about it.

I started keeping track of meals we liked, 
meals that were easy, 
ingredients that you could find 
at the regular grocery store, 
meals that were healthy & 
meals that everyone actually would eat 
with out whining about it

I started making groceries lists and then

I found Pinterest

Frikkin life changer people

I have decided to put together a post of really great meal ideas that I have tried & have worked. Some are from Pintrest,
 some are from the web or from magazines.  
I will include some helpful hints along with each recipe too!

 These tried & true recipes have been super simple to make & have been enjoyed by pretty picky eaters.  
With a little planning ahead I can honestly say 
I have stopped reaching for the Xanax 
every time I heard the bus in the afternoon.


Mediterranean One Dish


http://www.tasteofhome.com/Recipes/Mediterrean-One-Dish-Meal#.T-MielivbA8.pinterest

This one is super simple, you use one pot and that's it!
We serve it with pita & hummus or Tzhiki
I dont care for oregano so I leave it out
We also serve with feta on the table 
so you can add as much or as little as you want
Same goes for the olives


Applesauce Glazed Pork Chops


http://www.tasteofhome.com/Recipes/Applesauce-Glazed-Pork-Chops

Ok so this one I have made with pork tenderloin 
sliced into medallions.
It takes no time to cook and is soooo easy

Serve with a green veggie & rice

Done with dinner


Mongolian Beef

http://www.pinkbites.com/2009/01/mongolian-beef.html

Another super simple one
most of this stuff you have on hand

Serve with rice & brocolli 


For this one I used pork tenderloin cut up into tiny slivers rather than ground pork
I also made the cucumber salad as a side rather than putting it inside the pita
This was soooo quick & easy


Chicken Pot Pie "Cupcakes"

http://quick-dish.tablespoon.com/2012/03/07/chicken-pot-pie-cupcakes/

This actually works

It is so easy its stupid!
This is one of those quick meals to make when its 
just you & the kids
Serve with salad
Done

Hopefully these are a few new super simple recipes to make your life easy.

Let me know if you tried them and what your family thought!

(many of these were found on Pinterest, in magazines or on the web.  I made sure to give credit to all original sources.)

Friday, October 12, 2012

Grapevine & Burlap Rosette Wreath

So I have totally been on a wreath extravaganza lately
It is a simple way to change things up for the seasons
and so far the ones that I have made 
have been really frikkin easy

I found this one 


on Pinterest...of course
Here is the technique Jenni recommended to make rosettes


For this wreath

Really all you need is:

*Burlap
*Glue Gun & lots of glue sticks
*Grapevine Wreath 

Thats it!

I love the wispiness of these grapevine wreaths
but it would work with anything

I am soooo addicted to burlap
Its everywhere
I love how elegant & rough it looks at the same time


So here are few pics I took along the way
and some instructions too

It is really simple, so I am sure my lame attempt at explaining isn't really needed but here we go...


So I started with about a 1 1/2--2 inch thick strip of Burlap 


 I rolled, twisted & glued.  
 as I went to get the rosette look
Roll, twist & glue
Roll, twist & glue

Kinda like
Lather, rinse, repeat...
hee


You really cant screw this up, the faster I went, the more sloppy the rosettes were & I actually liked the sloppy ones better,
kinda like I do in real life
(liking the sloppy ones, that is)


Then I lined the rosettes up along the circle (inner part) of the wreath till they looked right
again i just eyeballed them


I was going with the odd number rule too
Love how that works out!
This is the finished wreath


Hanging on the front door


Close up


I also made a tiny one for a bridal shower

& attached a Gift Card.  

Kinda a nice gift?!?!

So that's it, lots of fun to make & super easy!

Let me know if you try one!


Friday, September 21, 2012

Burlap & Denim Wreath

So I was totally inspired by this wreath on Pinterest

Burlap and Denim Wreath


I had just cleaned out a ton of 
oh so flattering 
hideous mom jeans
from my closet 


PLUS  

I had burlap that I HAD TO BUY when I was in JoAnns.

This was the perfect time to make this wreath


Here is how I did it

Unfortunately I didnt take pics as I went but it was so easy...

Cut a long strip of burlap and wrap it around a foam wreath
(Using a glob of glue from my glue gun to anchor it) 
I just wound it around the wreath till it was fully covered.
I did a few more globs of hot glue as I went
then at the end of it too.  
I actually didn't have enough of the burlap strip cut 
to cover the whole thing 
cause I am really precise when I measure stuff
wait no I'm not
I wing it....
so I just glued the added piece to the back 
shhh, nobody will see the back anyway

Cut strips of denim to make the rosettes and create the flowers
I liked the different shades of denim too
(was wishing I still had my acid wash jeans for this--HA)

I used the tutes from these 2 sites


via-http://rebekahgough.blogspot.com


Rosette Flowers

via-http://mysparkle.blogspot.com


There are like a zillion tutorials on how to do flowers on Pinterest and YouTube
Just pick one you like, you really cant mess this up!!!


 For the "Welcome" sign I used an old cereal box 
to cut the little pennant triangles 
then used Tacky Glue to stick the denim to them 
then cut around them to make them even & neat


 I stamped "Welcome" using acrylic paint and clear rubber stamps from Michaels, they are so old, but i love them still!!

I hole punched two holes in each corner & threaded twine
I just played with it till it sat right


Here it is all finished

I totally love it
It isn't exactly like the one on 

The Magic of Ordinary Things Blog


But I am really happy with it!

Friday, June 29, 2012

Summer time things to do with the girls


We are in a year round school 
 our calendar is weird
We are in 9 weeks (called track/ed in), 
off 3 weeks (called track/ed out)
We love it
Most people who have never lived the year round calendar
cringe when we say we are in school year round
But really, it is AWESOME

I love track out time
except
sometimes I panic.....

like today

today is the last day of school

I am in panic mode....
did I say that already?

I feel like I am Julie the cruise director

....without a clipboard

OK, so we only have a week off between grades-
aka-summer vacay

weird... 

I know

we track in on July 9th
(first day of school)
...weird

We track out July 27
for 3 weeks
...weird

then we track back in
August 20th 
...weird


SO rather than popping Xanax like its candy I turned to my trusty old Pinterest to get me through trying moments Track out

Here are 10 Pinterest inspired Summer Ideas 
I am going to do with the girls during our 1 week "summer vacay" & our 3 week track out in August


My girls are not the most artistic but every once in a while they will find a picture & try to copy it, they will love this site!!!


I am pretty sure you can use the glass pebbles for this, 
with my Michael's coupon loaded on my iPhone
after we have gathered a few supplies 
we are ready to rock these out in no time!!!


I personally L-O-V-E these!
I am going to make one!!!


OK, a little more adventurous 
but would be a fun activity for dad to help us with, 
right, dad?!?!
Dad??
Yoo Hoo...
Dad???


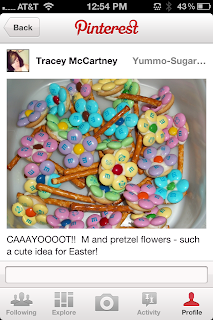
Pretty!


There isn't a link for these 
but it is just stick pretzels, hershey white chocolate kisses (Hugs) & M&Ms


Bookmarks

The link to these was no longer available 
but these are sooooo cute!


OK so I said 10, which turned into 11
if i don't stop now, 
I will be sitting here 
DREAMING 
up amazing things to do with my  kids 
rather than 
DOING 
amazing things with my kids

So I am stepping away from the computer
and Pinterest for now

Leave a comment if you have found any other fun things to do with your kids this summer!!!!

Thursday, June 21, 2012

Canvas Art with Pencil Transfer Techinique & Winnie the Pooh Quote

So for a while now my Bestie has been asking me 
to make a plaque of some kind 
for her daughter's HS graduation with the adorable quote:

“If ever there is tomorrow, when we’re not

together, there is something you must always

remember. You are braver than you believe,

 stronger than you seem, and smarter than you

think, but the most important thing is, even

if we’re apart… I’ll always be with you”.

-Winnie the Pooh 


Typical procrastinator/ADD/perfectionist/staller 
that I am it took me a while 
to figure out the perfect way to do this.....

Being left to my own creative devises 
I had a color scheme, the quote 
& a pic of the dorm room comforter 


Like with any task in my life now, I started scouring through Pinterest to find inspiration

I used a pencil transfer technique 
that was so frikkin easy 
I just have to reshare and show you what i came up with


I tried a few transfer techniques out there
-wax paper;  mod podge 

But I just couldn't get it right

Then I found the newspaper transfer idea
 I changed it up a little to make my own, 
and it worked!!!!

I think I learned this somewhere along the way in 
an art class or in a scrapbooking class!  
It is not an original idea.

OK 
so, back to the project


PENCIL TRANSFER TECHNIQUE


So here is a pic of the comforter set 
Loved the vines design so we went with that


(her set is fushia/black, doesn't look it here)


First step I "colored" on the back of the pic
 with a pencil


it's tricky, tricky, tricky
(90's hip hop song reference, sorry)

Next I flipped the paper over and placed it on the canvas where i wanted the design to show up

Then using a ball point pen, pressing firmly 
to make sure the transfer of the pencil marks showed up,
 I traced the outline of the vines


see, you can see them
really difficult technique here, ha!


Then I went back with my old scrapbooking markers
(Marvy-Artist)
and colored in the vines

TA-DA!!!
Glittered Unicorns & rainbows sprouted in my craftroom!

you could easily use a sharpie
I had one on standby if Marvy didn't work!


And this is what it looked like when I was finished with it!

I think I just heard angels sing


I love it

I think it came out so cute & it was really fun to make!

Supplies:
 canvas  
acrylic paints
ribbons
ink
card stock 
pencil  
marvy pen

WOOOO HOOOOO!

Here is me & Bestie with the graduate on her special day!


Congrats, B!!!